
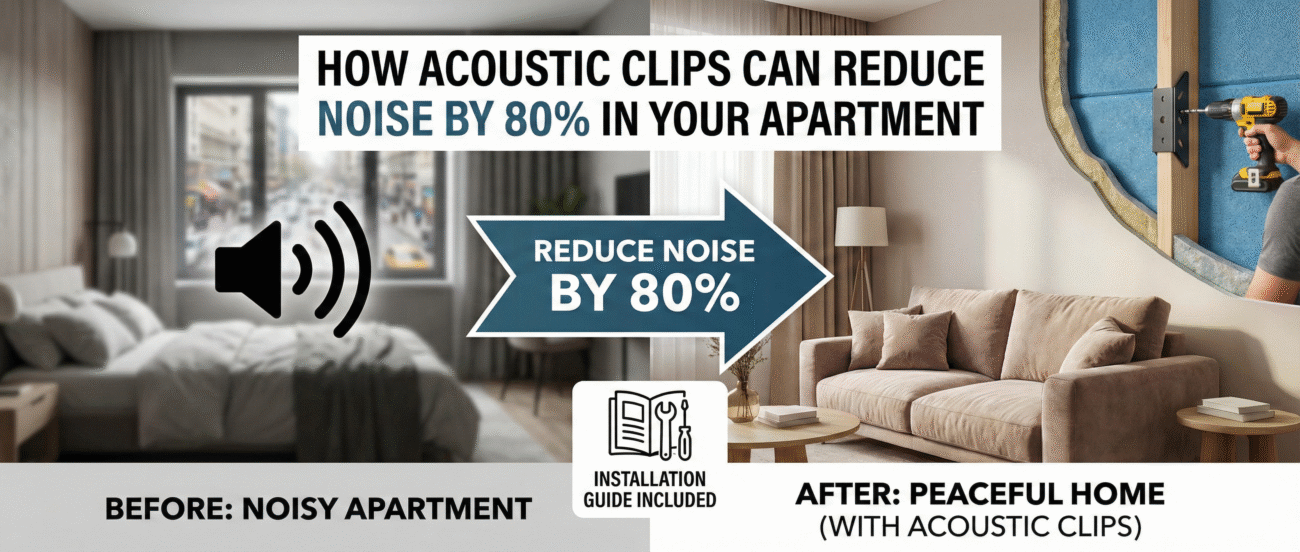
If you’ve ever been jolted awake by your upstairs neighbor’s footsteps at 2 AM or struggled to concentrate while the couple next door argues through paper-thin walls, you’re not alone. Noise pollution in apartments has become one of the most common complaints among renters and condo owners alike. The good news? Acoustic clips offer a proven solution that can reduce noise transmission by up to 80%, transforming your apartment into the peaceful sanctuary you deserve.
What Are Acoustic Clips and How Do They Work?
Acoustic clips are specialized soundproofing hardware designed to decouple drywall from wall studs or ceiling joists. This decoupling is the secret sauce of effective soundproofing. When sound waves travel through a building structure, they move through solid materials extremely efficiently—this is called structure-borne sound transmission.
Traditional construction attaches drywall directly to studs, creating a direct pathway for sound to travel. Acoustic clips interrupt this pathway by suspending the drywall on resilient rubber or spring-loaded mechanisms. When sound hits the wall, instead of transmitting through solid connections, it must cross an isolated air gap, where much of its energy dissipates.
The most common types include resilient sound clips (using rubber isolators) and spring-loaded clips (using metal springs). Both work on the same principle but offer different levels of isolation, with spring-loaded versions generally providing superior performance for low-frequency noise.
The Science Behind 80% Noise Reduction
The claim of 80% noise reduction isn’t marketing hype—it’s backed by sound transmission class (STC) ratings. A standard apartment wall typically has an STC rating of 33-35, meaning normal conversation is clearly audible. With acoustic clips properly installed, that same wall can achieve STC ratings of 55-60 or higher.
To put this in perspective, every 10-point increase in STC rating represents a perceived halving of sound. Moving from STC 35 to STC 55 means noise that was once clearly audible becomes barely noticeable. That 80% reduction translates to a dramatically improved quality of life.
The effectiveness comes from breaking the vibration pathway. Sound creates vibrations in the first wall surface, but acoustic clips prevent those vibrations from efficiently transferring to the studs and through to the other side. The isolated assembly essentially creates two separate walls with minimal connection points.
Identifying If Acoustic Clips Are Right for Your Situation
Before diving into installation, assess whether acoustic clips are the appropriate solution for your noise problems. They excel at blocking airborne sounds—conversations, television noise, music, and crying babies. They’re also effective against impact noise like footsteps, though ceiling installations require additional mass for optimal results.
Acoustic clips work best when you can install new drywall over existing walls or ceilings. If you’re renovating or building out an apartment, they’re an excellent choice. For renters or those unable to do major construction, other soundproofing methods might be more practical.
Consider your budget as well. While acoustic clips are cost-effective compared to professional soundproofing, a typical room project costs $800-2,000 in materials including clips, hat channels, drywall, and acoustic insulation. The investment pays dividends in peace and quiet, but it’s important to plan accordingly.
Complete Installation Guide: Tools and Materials
Successful acoustic clip installation starts with gathering the right tools and materials. You’ll need acoustic clips (one every 4 feet horizontally and vertically), hat channels (furring channels that attach to the clips), 5/8-inch drywall, acoustic insulation, a drill with appropriate bits, tin snips or aviation shears, a level, measuring tape, drywall screws, and joint compound.
For a standard 10×12 foot wall, expect to use approximately 15-20 acoustic clips, corresponding lengths of hat channel, and three sheets of drywall. Don’t skimp on insulation—filling the stud cavities with acoustic insulation like mineral wool dramatically improves performance.
Step-by-Step Installation Process
Start by removing existing drywall if you’re working with an existing wall. This gives you access to the studs and allows for proper insulation installation. Carefully inspect the wall cavity and seal any obvious air gaps or holes with acoustic caulk—air leaks are soundproofing’s worst enemy.
Install acoustic insulation in the stud cavities, filling them completely without compression. Compressed insulation loses effectiveness, so cut pieces slightly oversized and allow them to expand naturally into place.
Mark clip locations on the studs. Standard spacing is 48 inches horizontally and 48 inches vertically, though you may adjust for your specific wall dimensions. The bottom row should be about 6 inches from the floor, with subsequent rows evenly spaced.
Attach acoustic clips to the studs using the appropriate screws (usually included with the clips). Ensure they’re level and firmly secured—these clips will support the weight of your drywall, so solid attachment is crucial.
Snap hat channels into the acoustic clips horizontally. The channels should run perpendicular to the studs, creating a grid pattern when combined with the vertical clip spacing. Hat channels typically snap into place with satisfying clicks, but verify each connection is secure.
Cut and install drywall sheets, screwing them into the hat channels rather than the studs. Use drywall screws specifically designed for metal framing, spacing them every 12 inches along each hat channel. Avoid over-tightening, which can strip the thin metal.
Critical Mistakes to Avoid
The most common installation error is allowing screws to penetrate through the hat channel into the studs behind. This creates a direct sound bridge, defeating the entire purpose of acoustic clips. Use screws that are just long enough to secure drywall to the hat channel—typically 1-inch screws for 5/8-inch drywall.
Another frequent mistake is leaving gaps around the perimeter. Sound finds the path of least resistance, so unsealed edges around outlets, baseboards, and ceiling transitions can undermine your soundproofing efforts. Use acoustic caulk generously at all transitions and penetrations.
Skipping the second layer of drywall is tempting for budget reasons, but mass matters in soundproofing. Two layers of 5/8-inch drywall, preferably with Green Glue damping compound between them, provide substantially better performance than a single layer.
Maximizing Your Results: Additional Considerations
Acoustic clips work best as part of a comprehensive soundproofing strategy. Seal electrical outlets on shared walls with acoustic putty pads. Replace hollow-core doors with solid-core versions and add door sweeps. Address windows with acoustic curtains or secondary glazing if street noise is also a concern.
For ceiling installations blocking upstairs noise, add extra mass beyond just drywall. Some homeowners install a layer of mass-loaded vinyl before the drywall for additional low-frequency blocking, particularly effective against footfall noise.
Consider treating both sides of a shared wall when possible. While this isn’t always practical in apartments, if you own your unit and can coordinate with neighbors, acoustic clips on both sides create an exceptionally effective sound barrier.
Cost Analysis and Return on Investment
A typical bedroom wall project using acoustic clips costs approximately $1,200-1,500 for materials and can be completed by a handy homeowner over a weekend. Professional installation adds $800-1,500 depending on local labor rates and project complexity.
Compare this to the alternatives: moving to a quieter apartment often involves thousands in moving costs plus higher rent, while doing nothing means continued sleep disruption and stress. Studies show noise pollution negatively impacts health, productivity, and overall wellbeing—making soundproofing a valuable investment in your quality of life.
Real Results from Real Users
Homeowners consistently report dramatic improvements after installing acoustic clips. Noise that was once disruptive becomes background at most. One apartment dweller described finally being unable to hear their neighbor’s home theater system that had plagued them for years. Another reported that arguments next door, once clearly audible, became completely inaudible after installation.
The 80% reduction figure holds up in real-world applications when installations follow best practices. While you won’t achieve recording studio silence, you will achieve livable peace and quiet that makes your apartment feel truly like home.
Taking the Next Step
Armed with this knowledge, you can transform your noisy apartment into a peaceful retreat. Acoustic clips represent one of the most effective soundproofing solutions available to apartment dwellers, combining proven performance with DIY-friendly installation. The investment of time and money pays dividends every single day through better sleep, reduced stress, and improved quality of life.


